
Upgrade your Axminster Table Saw Fence Now!
Both me and Keith Brown, from YouTube’s “Rag ‘n’ Bone Brown’ channel, place the table-saw as one of the most essential tools in our workshops. However as all table saw owners will know, they’re not without their issues.
In a recent video, Keith takes another look at his Axminster AP254SB saw-bench style table-saw and, having decided it’s a keeper, sets about putting right 5 problems on his saw and in a collaboration with the Strawbyte Workshop I’ve been able to help with 2 issues with his fence based on fixes I had already devised for the same problems on the smaller (but very similar) AW254TS variant that I own.

Image 1: AT256SB Fence with scales fitted to both sides with the old optical pointer removed.
So let me share with you the following problems me and Keith have encountered and how the indicators improve things.
1. The FENCE-SCALE POINTER IS HARD TO READ
On axminster saws, the fence scale is read through a small window that contains a lens. A common hack is to install the lens upside down to how the supplied manual instructs you to install and adjust this. While this works to an extent, the simple plastic lens distorts the scale markings and getting a spot-on measured distance is a challenge.
Say hello to the new pointers. They attach to the fence via the t-tracks found in the fence extrusion. The ‘kit’ contains two pointers with the smaller one mounted to the extrusion nearest the table, the larger one in the other track. These pointers sit close to the rail and make setting zeroing the fence a breeze. It goes without saying that you will need to re-position or replace the tape scale on the fence rail, but once complete making small adjustments to the zero position is quick and simple; and essential for accuracy if you’re switching between blades with different kerfs.
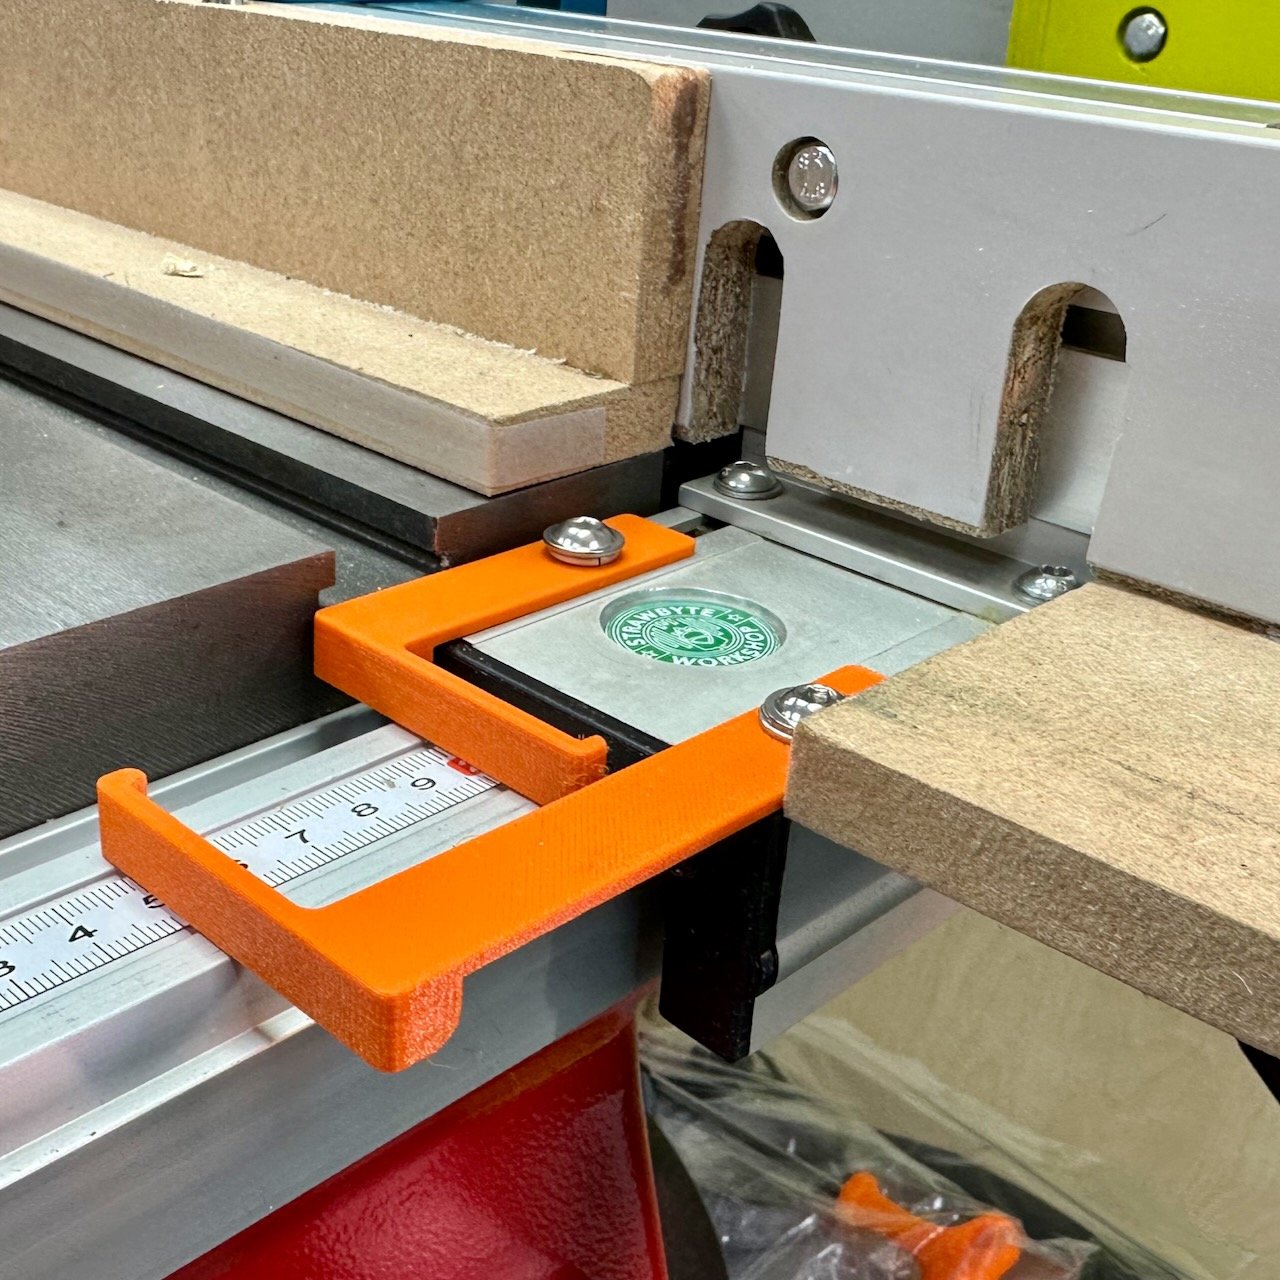
These scale indicators for Axminster table saw fences are designed to replace the manufacturer’s ‘lens’ style pointer. Two are supplied and are fixed to the T-Slot on the left-hand-side of the fence (as shown).
The smaller (Main) pointer is installed at the top and serves at the Zero pointer for the fence in it’s most commonly used configuration (normally without any auxiliary fence). Once set you need only make small adjustments when changing between blades with different kerf sizes.
The larger (Auxiliary) pointer is installed at the bottom and provides a way of zero’ing the fence to the blade when an an auxiliary fence of up-to 50mm width is installed. Typically this is when a sacrificial fence is installed for non-through cuts such as rebates (rabbats) are made with the blade very close to the fence. The auxiliary fence pointer allows for constant adjustment without having to touch the main pointer.
The kit is supplied with a Main Pointer and Auxiliary Pointer in orange PETG or ABS, plus two 10mm M6 washer-head bolts, two washers and two M6 square nuts. Installation instructions are included.
You will need to remove and reposition the existing scale on the fence rail. Alternatively (and probably easier and neater) is to simply replace the scale with a self-adhesive steel tape (measurement left to right) These are available from Amazon and Ebay and links are included below.
For these smaller table-saw, positioning the fence on the right-hand side of the blade is not as common. Typically only those AC/AW saws with the left-hand-side table will have sufficient room on the fence rail to make this possible with these replacement pointers. You will need a separate scale that reads right to left (links below).
Click here for full details on how to install and use the pointers. You can find them in the Strawbyte store for purchase as a physical product, or as digital file if you wish to print your own at home.
Products in-store:
Digital Downloads
Coming soon, but if you’re interested in obtaining the files to ‘print at home’ please contact me (Karl) via the Contact Us page
Recommended Replacement Fence Scales
UJK R/H Self Adhesive Steel Tape 3M Metric (axminstertools.com)
UJK L/H Self Adhesive Steel Tape 3M Metric (axminster) (For left-hand side of fence)
Self Adhesive Tape Measure Metric 2M (brand: Sourcing Map) (Amazon.co.uk)
Self Adhesive Tape Measure Dual Scale 2M (brand: Sourcing Map) (Amazon.co.uk)
2. The Scale is Useless when using an Auxiliary Fence
There are many reasons why you might choose to install an auxiliary fence. The two common scenarios in my shop are.
Using an auxiliary fence as a ‘sacrificial’ fence when needing to use the blade very close to the fence for non-through cuts.
Using an L shaped auxiliary fence to make narrow rips safer or when ripping or cross cuting with the mitre gauge thin panels or parts.
But with anything attached to the fence the fence scale is no longer usable as normal. So that’s where the larger additional pointer helps out.
The larger pointer allows you to zero the saw in when using an auxiliary fence without having to adjust the pointer set-up for your normal fence and blade. It can accomodate auxiliary fences up-to 50mm wide and adjustment takes moments.
Once again check-out the instructions for how to do this.

Image 2: Axminster AC254TS, indicators fitted showing main indicator and the adjustable auxiliary indicator.
3. The visualising the blade Kerf
The new pointers have to have a thickness so I thought why not make the pointer the same thickness as the blade kerf itself. If the fence is to the right of the blade, set the zero by referencing the right-hand-side of the pointer. For me this means that when I look at the scale the I see the blade kerf. For certain cuts this reduces the likelihood of mistakes.
When you order the pointers from the website you’ll be asked by email for your blade kerf measurement, with the normal supplied measurement defaulting to 1/8” or 3.2mm
I had thought originally that ‘Waste Side Jig’ thinking might make this much more useful. But in practice is you’re looking to make accurate housing joints (dados) or rebates (rabbats) on the table saw there are simpler, more empirical, and more accurate techniques where you won’t actually need to reference to scale on the fence.
SUMMING-UP
It’s probably no mistake that Axminster included small t-tracks to the fence extrusions on their table saw. They invite you to customise the saw and make it your own. These indicators make setting up for a cut using the fence scale easy, quick and accurate.
If you’re interested in getting some of these for your saw, then please use the links in this article.
Happy Woodworking
Karl.